Payment gateways
This page walks a first-time user through connecting every gateway Easy Invoice supports. Each section follows the same structure:
- What it does
- Where to get credentials (with exact dashboard links)
- Where to paste them in Easy Invoice (with the exact field labels)
- Webhook / IPN URL to copy
- How to test before going live
Common path: Easy Invoice → Settings → Payment — every gateway lives here as a collapsible row. Tick the checkbox at the top of a row to enable it, then fill in credentials below.
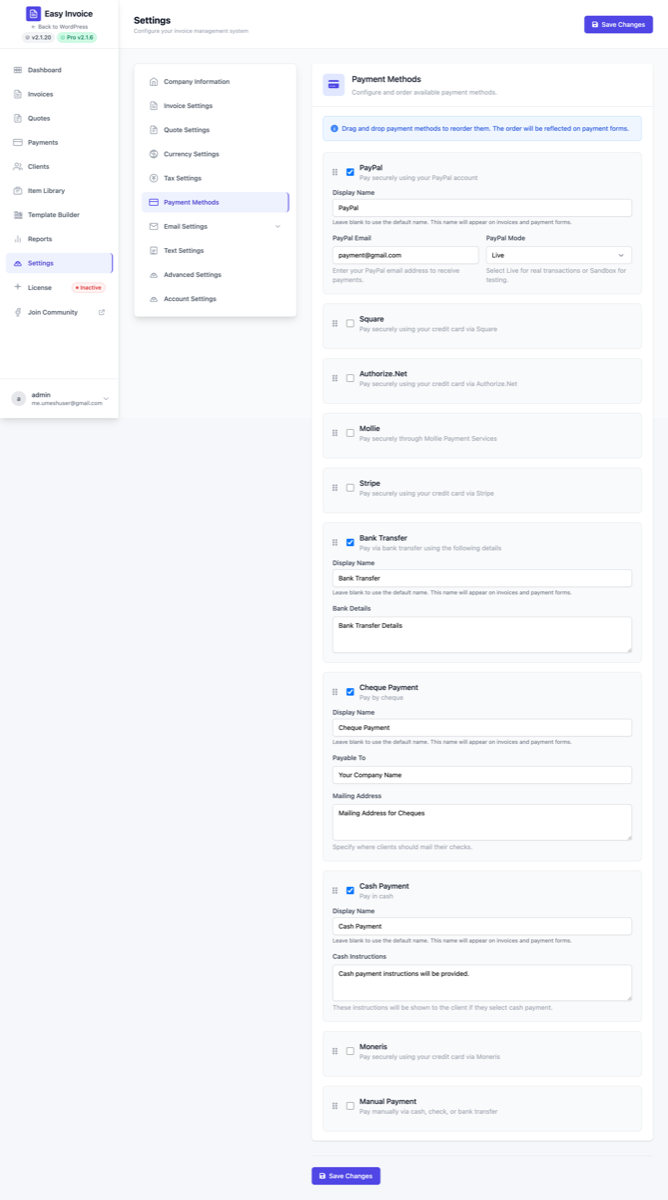
How the Payment page works (read this first)
When you open Easy Invoice → Settings → Payment, you'll see:
- A list of gateways (one row each). Each row has a checkbox to enable, a display name input ("Credit card", "Pay with PayPal" — anything you want clients to see), and credential fields below.
- A drag handle on each row — drag to reorder. The top-most enabled gateway becomes the default on the public invoice.
- Save Changes button (top right of the page).
If a gateway row is missing required credentials, the public invoice will not show it to clients even if its checkbox is on.
Without Pro: above the gateway list you'll see an "Unlock more payment gateways with Easy Invoice Pro" teaser block listing every Pro-only gateway (Stripe, Square, Authorize.Net, Mollie, Paystack, Moneris, Bank Transfer, Cheque, Cash). Click any row, or the View pricing button on the right, to upgrade. The block disappears as soon as Pro is active.
1. Manual FREE
Use this for any offline payment — cash in person, bank transfer you'll reconcile manually, anything where Easy Invoice doesn't talk to a processor.
Setup
- Go to Easy Invoice → Settings → Payment.
- Check Enable on the Manual row.
- Save.
That's it — there are no credentials. When a client picks Manual on the public invoice, they see a "We'll be in touch" message. You then mark the invoice as Paid yourself from Payments → Add New Payment.
When to use it
- One-off cash deals
- Wire transfer arrangements with a known client
- Cheque payments (Pro has a dedicated Cheque gateway with a mailing address field — see below)
2. PayPal Standard FREE
PayPal Standard is the simplest hosted checkout in WordPress invoicing — your client clicks Pay Now, lands on PayPal, pays, returns to your invoice.
What you need
A PayPal Business account (sign up free at paypal.com) — Personal accounts cannot receive merchant payments.
Step-by-step
- Open PayPal Business profile and copy the email address tied to your business account.
- In WordPress: Easy Invoice → Settings → Payment, find the PayPal row.
- Check the Enable box.
- Paste your business email into PayPal Email.
- Set PayPal Mode to
Live(orSandboxfor testing — see PayPal Developer sandbox accounts). - Click Save Changes.
IPN (instant payment notification)
PayPal Standard uses IPN, not REST webhooks. Easy Invoice listens automatically on admin-post.php so you don't have to paste a URL. If payments aren't marking themselves paid, check IPN history in your PayPal merchant dashboard for delivery failures.
Test it
- Send a $1 test invoice to yourself.
- Click Pay Now on the public invoice.
- Confirm the invoice is marked Paid automatically when you return.
3. Stripe PRO
Stripe powers credit card, Apple Pay, Google Pay, and Link checkout — modern, secure, available in 40+ countries.
What you need
A Stripe account (create one free at stripe.com).
Step-by-step
- Open the Stripe Dashboard → Developers → API Keys.
- Copy the Publishable key (starts with
pk_live_) and reveal + copy the Secret key (starts withsk_live_). - In WordPress: Easy Invoice → Settings → Payment, find the Stripe row, check Enable.
- Paste Publishable Key and Secret Key.
- Set Stripe Mode to
Live(orSandboxwhile testing — toggle the "Test mode" switch in Stripe to getpk_test_/sk_test_keys).
Webhook (critical — payments will not auto-mark as Paid without it)
- Go to Stripe Dashboard → Developers → Webhooks.
- Click Add endpoint.
- Paste this URL (replace
yoursite.com):https://yoursite.com/wp-admin/admin-ajax.php?action=easy_invoice_stripe_webhook - Select these events:
payment_intent.succeeded,payment_intent.payment_failed,charge.refunded. - Click Add endpoint. Stripe will show a Signing secret starting with
whsec_. - Copy that
whsec_…value and paste it into Easy Invoice → Settings → Payment → Stripe → Webhook Secret. - Save.
Test it (with Stripe test cards)
- Put Stripe in Sandbox.
- Use card
4242 4242 4242 4242with any future expiry and any CVC. - The full list of Stripe test cards is here.
4. Square PRO
Square is great for US/CA/UK/AU/IE/FR/JP/ES businesses — especially if you already use Square for in-person sales.
What you need
A Square Developer account (free).
Step-by-step
- Open Square Developer Dashboard → Applications.
- Pick (or create) an application. On the Credentials page, copy:
- Application ID (e.g.
sq0idp-…) - Access Token (production)
- Application ID (e.g.
- Open Locations and copy the Location ID for the location that should receive payments.
- In WordPress: Easy Invoice → Settings → Payment → enable Square.
- Paste Application ID, Access Token, Location ID.
- Set Square Mode to
Live(orSandboxwhile testing).
Webhook (required for auto-reconciliation)
- In your Square app, go to Webhooks → Subscriptions → Add subscription.
- Notification URL (replace
yoursite.com):https://yoursite.com/wp-admin/admin-ajax.php?action=easy_invoice_square_webhook - Subscribe to:
payment.updated,refund.updated. - After creating the subscription, copy the Signature Key.
- In WordPress, paste the Signature Key into Webhook signature key.
- Paste the exact same URL above into Webhook notification URL (must match exactly — same scheme, host, path, query — or signature verification fails).
- Save.
Why Easy Invoice asks for the notification URL twice: Square signs each webhook with the URL it was configured against. If the URL configured in Square doesn't byte-match the URL we expect, the signature check rejects the webhook. Paste both.
5. Authorize.Net PRO
Long-standing US gateway. Accepts cards and eChecks.
What you need
An Authorize.Net merchant account (open one here).
Step-by-step
- Log in to your Authorize.Net Merchant Interface.
- Go to Account → Settings → Security Settings → API Credentials & Keys.
- Copy the API Login ID and generate / copy the Transaction Key. (Help: how to obtain them.)
- On the same page, generate / copy the Signature Key. (Help: what is a Signature Key.)
- In WordPress: Easy Invoice → Settings → Payment → enable Authorize.Net.
- Paste API Login ID, Transaction Key, Signature Key.
- Set Authorize.Net Mode to
Live(orSandbox: get free sandbox credentials at developer.authorize.net).
Webhook
- In Authorize.Net: Account → Webhooks → Add Endpoint.
- Endpoint URL (replace
yoursite.com):https://yoursite.com/wp-admin/admin-ajax.php?action=easy_invoice_authorizenet_webhook - Events:
net.authorize.payment.authcapture.created,net.authorize.payment.capture.created,net.authorize.payment.refund.created,net.authorize.payment.void.created. - Save. Webhooks are signed with the Signature Key you already pasted.
6. Mollie PRO
European-favourite gateway — supports iDEAL, Bancontact, SEPA Direct Debit, Klarna Pay later/in 3, Sofort, Giropay, EPS, PayPal, and credit cards.
What you need
A Mollie account (sign up free here).
Step-by-step
- Open Mollie Dashboard → Developers → API Keys.
- Copy the Live API key (starts with
live_) and Test API key (starts withtest_). - In WordPress: Easy Invoice → Settings → Payment → enable Mollie.
- Paste both keys into Live API Key and Test API Key.
- Set Mollie Mode to
LiveorSandbox.
Webhook
Mollie generates the callback URL automatically when each payment is created — no manual webhook setup. Make sure your site is reachable from *.mollie.com.
7. Paystack PRO
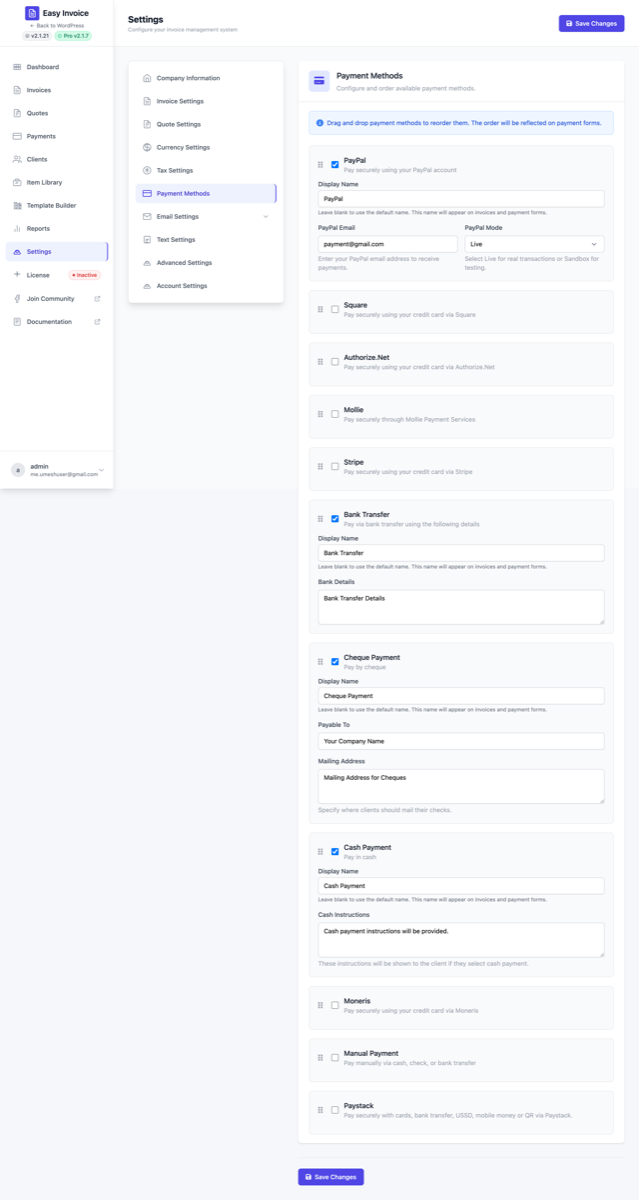
The right pick if you sell into Africa — Nigeria, Ghana, South Africa, Kenya, plus international USD. Paystack accepts cards, bank transfers, USSD, mobile money (M-Pesa, MoMo) and QR codes through one hosted checkout.
What you need
A Paystack merchant account (sign up free at paystack.com).
Step-by-step
- Open Paystack Dashboard → Settings → API Keys & Webhooks.
- Copy your Live Public Key (starts with
pk_live_) and reveal + copy the Live Secret Key (sk_live_). Also grab the Test Public Key (pk_test_) and Test Secret Key (sk_test_) if you'll test in sandbox first. - In WordPress: Easy Invoice → Settings → Payment, enable the Paystack row.
- Paste Live Public Key / Live Secret Key (and Test pair if you want).
- Set Paystack Mode to
Livefor real transactions orTestfor sandbox. - Click Save Changes.
Webhook (critical — payments only auto-mark as Paid if this is set)
Paystack confirms each payment via a signed webhook. The plugin won't trust unsigned events — it verifies HMAC-SHA512 of the raw body against your secret key before writing anything.
- Still on Dashboard → Settings → API Keys & Webhooks, find the Webhook URL field.
- Copy the URL from the Webhook URL (copy into Paystack) field that Easy Invoice shows in the Paystack settings row. It looks like:
https://yoursite.com/wp-admin/admin-ajax.php?action=easy_invoice_paystack_webhook - Paste it into Paystack's Webhook URL field. (Paystack uses one URL for live + test events.)
- Save. No further config is needed — signature verification uses the same secret key you already pasted.
Supported currencies
Paystack accepts amounts in: NGN, GHS, ZAR, KES, USD, EGP, XOF. Easy Invoice will refuse to start a Paystack checkout if the invoice currency is outside this list. Pick the right currency under Settings → Currency or on the per-invoice Payment tab.
Test it (with sandbox test cards)
- Put Paystack Mode =
Testand use yourpk_test_/sk_test_pair. - Use any Paystack test card — e.g.
4084 0840 8408 4081, expiry any future date, CVV408, OTP123456. - After the test payment, return to the invoice — it should be marked Paid automatically.
Local development tip: webhooks can't reach
localhost/.localsites. Use ngrok or Cloudflare Tunnel to expose your dev site, then paste the public tunnel URL into Paystack's Webhook URL field.
8. Bank Transfer PRO
Shows your bank details on the invoice and lets the client upload a payment-proof file when they pay.
Setup
- Easy Invoice → Settings → Payment → enable Bank Transfer.
- Fill Bank Details — multi-line text. Include: Account name, Bank name, IBAN/Account number, SWIFT/BIC, Reference instructions.
- Save.
When clients pick Bank Transfer at checkout, they see the bank details and an upload field for a transfer receipt. You then verify and mark the invoice Paid in the admin.
9. Cheque PRO
For "send us a cheque" workflows.
Setup
- Enable the Cheque row.
- Fill Payable To — the exact name to write on the cheque.
- Fill Mailing Address — where to send the cheque.
- Save.
Clients see your payable name + mailing address on the public invoice and can mark "Cheque mailed" — which sets the invoice to a pending state until you confirm.
10. Cash PRO
Like Manual, but with an explicit cash-only label.
Setup
- Enable the Cash row.
- Fill Cash Instructions — e.g. "Hand over at our store between 9 AM and 6 PM, Mon–Fri."
- Save.
11. Moneris PRO
Canada's largest payment processor — Visa, Mastercard, AMEX, Interac Online.
What you need
A Moneris merchant account.
Step-by-step
- Log in to your Moneris Merchant Resource Center and access Integration Settings. (How to access.)
- Copy your Store ID and API Token. (How to get API Token.)
- For testing, request test credentials from Moneris Developer Portal → Credentials.
- In WordPress: Easy Invoice → Settings → Payment → enable Moneris.
- Paste Moneris Store ID, Moneris API Token, and (optionally) Test Store ID + Test API Token.
- Set Moneris Mode to
LiveorTest.
Choosing the right gateway
| Need | Best fit |
|---|---|
| Just take any payment for free | Manual + PayPal (Free) |
| Take credit cards globally | Stripe PRO |
| Already use Square at a physical store | Square PRO |
| US merchant on an existing gateway | Authorize.Net PRO |
| European customers (iDEAL, SEPA, Klarna) | Mollie PRO |
| Africa-focused (NGN/GHS/ZAR/KES) or USSD/mobile money | Paystack PRO |
| Canadian merchant (Visa, MC, Interac) | Moneris PRO |
| Wire transfer business | Bank Transfer PRO |
| Old-school cheque clients | Cheque PRO |
| Cash on delivery / in-person | Cash PRO |
Common problems
"Payments aren't being marked as Paid automatically." → Your webhook isn't reaching WordPress. Copy the webhook URL exactly as shown, including ?action=…. Many caching plugins block admin-ajax.php — whitelist that URL. See Troubleshooting.
"The gateway row is enabled but doesn't appear on the public invoice." → Missing credential. Re-open the row and check every required field is filled. Save again.
"I'm in Sandbox but real charges happened." → You pasted live keys but kept Mode = Sandbox (or vice versa). Live keys always charge real cards regardless of Mode. Re-confirm the pk_test_ / pk_live_ prefix in Stripe, or the explicit Sandbox toggle in Mollie/Square/Authorize.Net.
"PayPal IPN failures." → Open your PayPal dashboard → History → IPN history to see what failed. Common cause: WordPress site blocking PayPal IPs at the firewall.