Invoices — step-by-step for first-time users
If this is your first invoice ever in Easy Invoice, follow this page top to bottom. Every field on the Invoice Builder is listed, with why you'd fill it in and what the client sees when you do.
Need help setting up your defaults first (company name, logo, currency, prefix)? Run through the Quick start first, then come back here.
What an invoice looks like end-to-end
| Stage | Where it happens | Status |
|---|---|---|
| 1. Create it | WP Admin → Easy Invoice → Add New Invoice | Draft |
| 2. Mark Available | Click Publish / Available in the builder | Available |
| 3. Send to client | Send Email button in the builder | (email sent) |
| 4. Client pays online | Public invoice URL → gateway → return | Paid (auto, with webhooks) |
| 5. Or record a manual payment | Easy Invoice → Add New Payment | Paid (manual) |
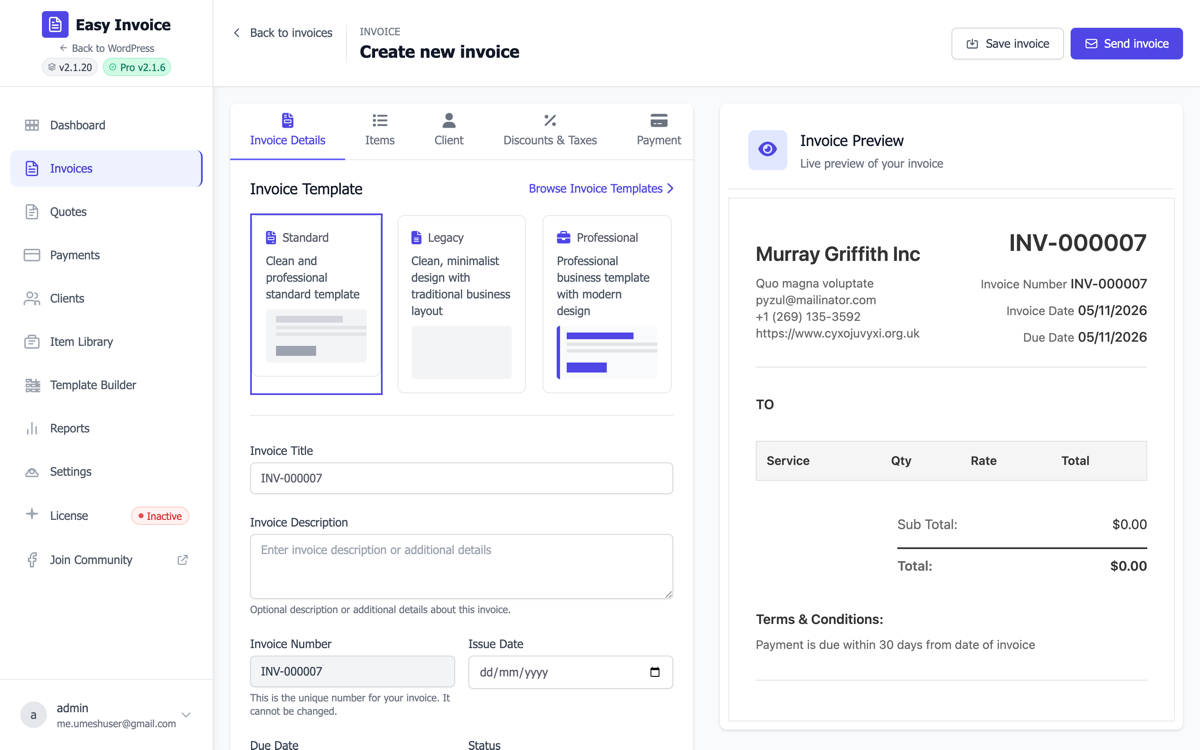
1. Open the Invoice Builder
WP Admin sidebar → Easy Invoice → Add New Invoice.
The builder opens with five tabs on the left:
- Invoice Details — the basics (title, number, dates, status, notes, terms)
- Items — what you're billing for
- Client — who you're billing
- Discounts & Taxes — pricing modifiers
- Payment — gateways and currency override
You don't have to fill them in this exact order — the builder remembers everything between tabs and saves on Publish.
2. Invoice Details tab
Invoice Title
What it is: A short label like "Website design — May 2026". Why it matters: Shows in your invoice list (admin) and on the public invoice page right under the invoice number. Helps both you and the client identify which job this invoice is for.
Invoice Description
What it is: Free-text paragraph. Why it matters: Optional. Use for context that doesn't fit in line items — "This invoice covers Phase 1 only; Phase 2 will be invoiced separately."
Invoice Number
What it is: Auto-generated from your prefix + counter (e.g. EIIN_0042). Why it matters: Read-only by default — auto-increment keeps numbers sequential, which most tax authorities require. The format is set under Settings → Invoice → Invoice Prefix and Next Invoice Number.
Issue Date
What it is: The day you consider the invoice "issued" (today, usually). Why it matters: Many tax regimes calculate VAT/GST based on issue date, not due date. Set this carefully if you're back-dating.
Due Date
What it is: When the invoice should be paid by. Why it matters: Drives the "Overdue" badge, the auto-email payment reminders (Pro), and the "X days late" warnings on your dashboard.
Suggested default: Issue Date + 30 days for B2B, Issue Date + 7 days for retainers.
Status
| Status | What it means | When to use |
|---|---|---|
| Draft | Hidden from clients, not yet "issued" | While you're still editing |
| Available | Live and visible at the public URL | Once you're ready to send |
| Unpaid | Sent, not yet paid | After sending (set automatically) |
| Overdue | Past the due date, unpaid | Auto-set on the due date |
| Paid | Payment recorded | After a payment is collected |
| Cancelled | Withdrawn | If the deal falls through |
Notes
Visible to the client on the PDF/public invoice — use for "thanks!" or special instructions.
Internal Notes
Not visible to the client — for you and your team only. Use for "client wants Net 60 — already approved by Sarah."
Payment Terms
The terms paragraph at the bottom of the invoice. Defaults to your global Settings → Invoice → Terms & Conditions — override per invoice if needed.
3. Items tab — what you're billing for
Click Add Item to add a line. Each item has:
| Field | Why it matters |
|---|---|
| Item Title | Short name — what shows on the invoice (e.g. "Website design"). |
| Description | Multi-line explanation under the title. Useful for breaking down what's included. |
| Quantity | Number of units (hours, items, etc.). Use 1 for fixed-price jobs. |
| Price | Unit price. |
| Adjust (%) | (optional) Markup or markdown for this item only. +10 adds 10%, -25 subtracts 25%. Hide this column globally via Settings → Invoice → Show/Hide Adjust Field if it confuses clients. |
| Total | Auto-calculated (Qty × Price + Adjust). Read-only. |
| Taxable | Tick to include this item in the invoice tax calculation. Untick for tax-exempt items. |
Pro tip: With Pro's Item Library, you can save your common line items (hourly rate, support retainer, hosting) and add them with one click. PRO
4. Client tab — who you're billing
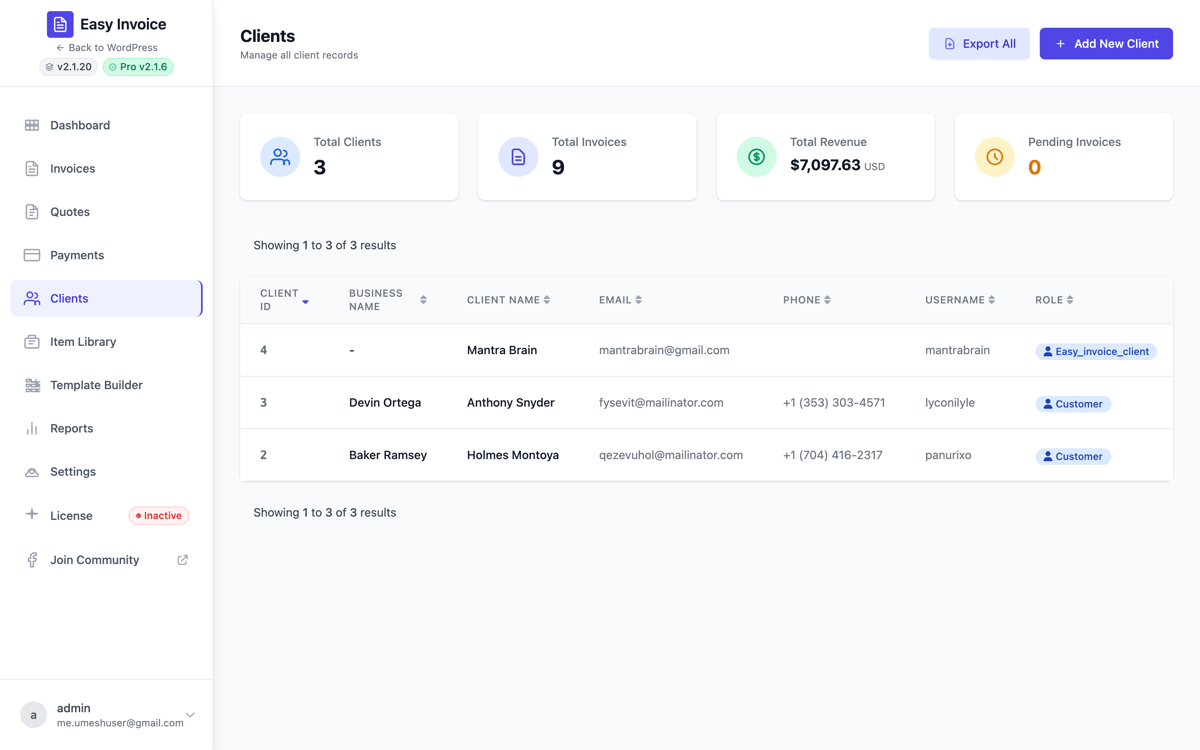
Select Client (dropdown)
Pick from existing clients you've already added. Each client is created under Easy Invoice → All Clients → Add New Client with:
- Business name (or first + last name for individuals)
- Billing email
- Phone, website
- Billing & shipping address
- Tax / VAT number
If you don't have a client yet, save the invoice as Draft, jump to All Clients → Add New, then return.
Why this matters: the selected client's email is who receives the Invoice Available email when you click Send Email. Their billing address is printed on the invoice header under "Bill To".
5. Discounts & Taxes tab
Discount Type
- No Discount — skip the whole section.
- Percentage — e.g. 10% off the subtotal.
- Fixed Amount — e.g. $50 off.
Discount Value
The number that goes with Discount Type (10 for 10%, 50 for $50).
Calculation Method
- Before Tax — discount reduces the taxable amount, then tax applies. (EU-friendly)
- After Tax — tax is applied on the full subtotal, then the discount comes off the total. (US-friendly)
This choice matters for legal accuracy — check what your local tax authority requires.
Tax Rate (%)
Override the global default tax rate (set in Settings → Tax → Default Tax Rate). Use 0 for tax-exempt invoices.
Price Includes Tax
- No (default) — the prices you typed in Items are net, tax is added.
- Yes — the prices you typed already include tax; Easy Invoice extracts the tax portion for reporting.
Why it matters: in the EU, most B2C catalog prices include VAT by default. In the US, prices are typically net.
Additional Tax fields PRO
If you've enabled Pro → Additional Tax (e.g. for Canadian GST + PST), a second tax block appears here. See Settings reference → Tax for the calculation modes.
6. Payment tab
Payment Gateways
Tick which gateways the client can choose on this specific invoice. Defaults to all enabled gateways from Settings. Untick to hide one for this invoice — useful for "this big client gets bank transfer only, no card fees."
Currency
Per-invoice override. Defaults to Use from Global Settings. Set when you bill an international client in their currency.
Currency Symbol Position
Same idea — override the global symbol position (before/after the number) for this one invoice.
7. Save, mark Available, send
When you're done editing:
- Click Save Draft to keep editing later, or
- Set Status to Available and click Publish — the invoice goes live at a public URL.
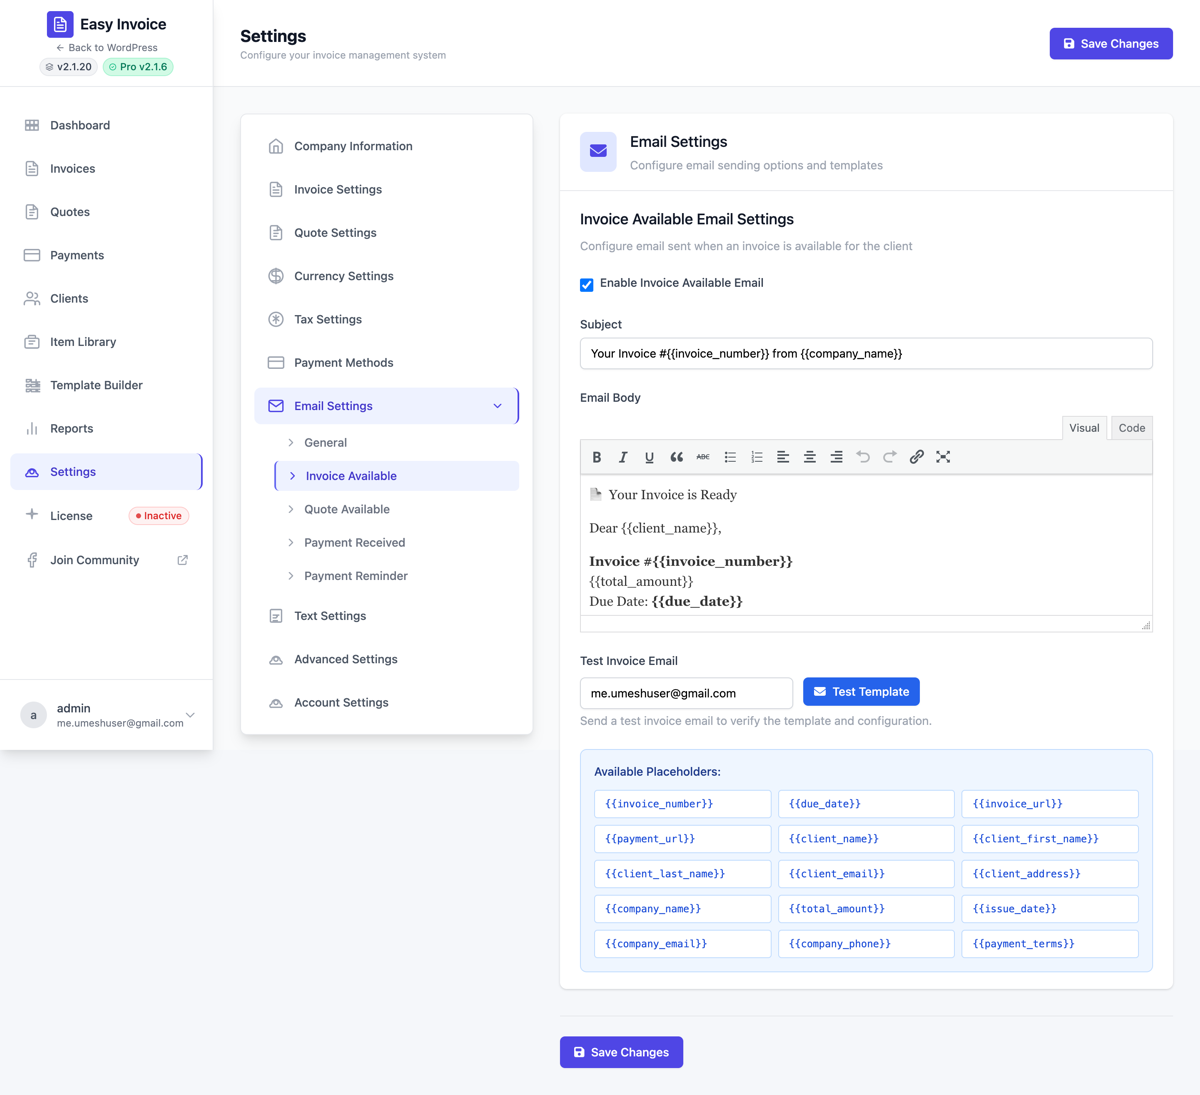
- Click Send Email to email the Invoice Available template to the client.
The email body and subject come from Settings → Email → Invoice Available. The default body includes a Pay Now button that links to the public invoice. See Email & notifications for editing the template.
8. The public invoice page
When your client opens the link (or PDF) they see:
- Your logo + company details (top left)
- Their billing details (top right)
- The line items table
- Subtotal, discount, tax, total
- A Pay Now button (if at least one gateway is enabled on this invoice)
- The Print and Download as PDF buttons (their labels can be renamed via Settings → Text Settings)
Once they pay (via Stripe/PayPal/etc.), the webhook fires and the invoice is marked Paid automatically. They also receive your Payment Received email.
9. The invoice list
WP Admin → Easy Invoice → All Invoices shows every invoice with quick filters by status and a search box.
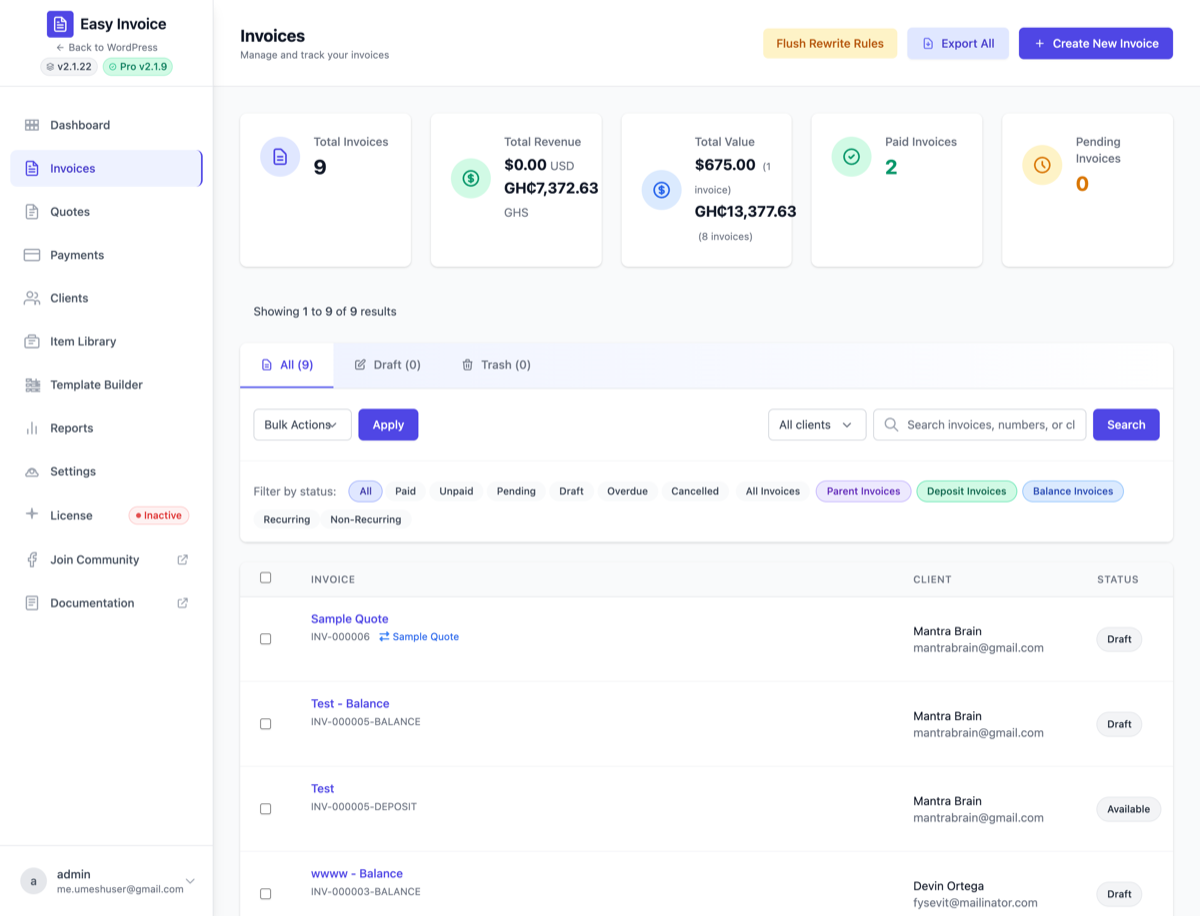
Filter by client (Free)
The Filter by client dropdown next to the search box narrows the list to one specific client's invoices. The filter sticks across:
- view-tab switches (All / Draft / Trash)
- status-filter chips (Paid / Unpaid / Overdue / …)
- pagination
- the search box
Pick All clients to clear the filter.
Bulk Send Email PRO
With Easy Invoice Pro active, the Bulk Actions dropdown gains a Send Email option. Use it to:
- Tick the checkboxes next to the invoices you want to email.
- Pick Send Email in the Bulk Actions dropdown.
- Click Apply — confirm the dialog.
- Easy Invoice Pro dispatches the configured Invoice Available email to every selected invoice's client, then shows a "Sent: X ok, Y failed" toast.
This is one of the highest-impact Pro features for end-of-month invoicing — a single click replaces opening each invoice individually and clicking Send.
Bulk Export Selected PRO
Need invoice data for accounting or an external audit? The Export Selected bulk action streams a UTF-8 CSV of just the rows you've ticked — no separate Export screen, no date filter to set up.
- Tick the checkboxes next to the invoices you want to export.
- Pick Export Selected in the Bulk Actions dropdown.
- Click Apply — confirm the prompt ("Download a CSV of N selected invoices?").
- Your browser downloads
easy-invoice-invoices-YYYY-MM-DD.csv.
Columns exported: Invoice Number, Title, Client Name, Client Email, Issue Date, Due Date, Status, Subtotal, Tax, Discount, Total, Currency, Payment Method, Payment Date, Transaction ID.
The CSV ships with a UTF-8 BOM so Excel opens it with the right encoding — works straight in QuickBooks Online, Xero, FreshBooks, and any spreadsheet.
Without Pro: the option still shows as Export Selected (Pro) and picking it opens the Upgrade-to-Pro dialog with a one-click upgrade link.
Row actions
- View — open the public invoice
- Edit — back to the Invoice Builder
- Duplicate — clone with a fresh number (great for repeat jobs without recurring billing)
- PDF — download
- Send — re-send the email (single invoice)
- Delete — trash
Tips for new users
- Don't worry about getting numbering perfect on day 1. Pick a prefix you like (
INV-,EIIN_, year-based like2026-). You can change it later via Settings; existing invoices keep the number they were created with. - Set realistic due dates. Net 7 / 14 / 30 are common. Anything shorter than 7 days for B2B feels aggressive.
- Customize one email template. The default Invoice Available body works fine, but adding a personal sentence at the top dramatically improves payment speed.
- Test with yourself first. Email a $1 invoice to your own address, pay it, watch the whole flow — that's the fastest way to learn the system.
Pro-only invoice extras
- Item Library PRO — saved products/services, one-click add. Read more
- Recurring PRO — bill monthly/quarterly/yearly automatically. Recurring invoices guide
- Partial payments PRO — let clients pay in installments. Settings reference
- Deposit invoices PRO — split an invoice into deposit + balance.
- Watermarks PRO —
DRAFT,PAID,CONFIDENTIALoverlay on the PDF. - Template Builder PRO — drag-and-drop PDF layout designer. Read more